
Congratulations on deciding to incubate your own chicks! Before you get started, you should know that incubating is not a “set it and forget it process.” It can be challenging and frustrating but in the end, we’re here to help you through the process because the rewards make it all worthwhile!
We recommend when setting up your incubator, please follow the product instructions included with your unit and be sure to consult with your local library, local college/university agriculture department or the internet for additional hatching information regarding temperature and humidity levels for your breed in your area.
Please note that in addition to regulating the temperature and humidity within your incubator, there are many other factors that contribute to the success of your hatch including: fertility of the eggs used, age of the eggs, what condition the eggs were stored in prior to incubation, shell condition, cleanliness of the egg, and handling (turning) of the egg during incubation.
In addition to the product instructions, below you will find some helpful tips to help give you the best results.
Check Your Humidity
Humidity levels are an important part of a successful hatch. Please consult with your local college/university agriculture department or the internet for the appropriate humidity levels needed for hatching your breed in your area.
The hygrometer that comes with your incubator may not produce accurate readings until water is added to the channels. It may take an hour or longer once water is added for the hygrometer to settle out and give you an accurate reading. When adding water, we recommend using a clean turkey baster. Lift the lid and slide it far enough to allow a baster to fit between the lid and base.
Humidity will vary depending on the weather and temp in their area as well in the room where the unit is being placed.
For best results, set the humidity prior to settings eggs in the incubator:
- Fill one channel with water and run the incubator for a couple hours to allow the temp and humidity to stabilize.
- Take a humidity reading. If it is too low, fill another channel and repeat the process until humidity is at your desired level.
- Validate the humidity readout on the controller by using a separate hygrometer (digital or wet bulb) inside the incubator.
- If humidity is too high, you will need to remove water from one or more channels.
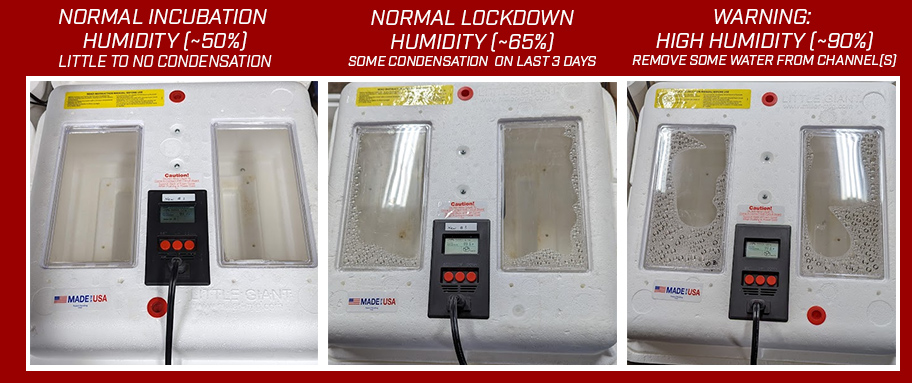
Note: Setting humidity can be a trial and error process. Channels 1 and 6 are larger than channels 2-5. The total surface area of water will determine your humidity and not the depth of the water in the channel. To increase humidity, add water to additional channels. Typical humidity settings for most species is around 45-55% during incubation and then increased to 60-70% during the last 3 days prior to incubation (lockdown).
It is normal to see a spike in humidity inside the incubator after the 1st egg hatches. This is due to moisture inside the egg being released into the incubator. You may need to remove water from a channel if the humidity spikes too high. During incubation, you should see little to no condensation on the windows. If there is excessive condensations hanging from the windows, your humidity is too high. Too much condensation could affect the circuitry of the incubator. Avoid high humidity for extended periods of time and thoroughly dry out the incubator after each use. The pics below are just one example. User results may differ based on the room temp and humidity.
In addition to observing humidity percentage, also be sure to look out for the formation of condensation within the housing. If the windows are completely fogged over or completely covered in condensation, your humidity levels may be too high. Some condensation on the windows can be expected during the lockdown period before hatching where the humidity in the unit is typically increased.
Check water channels daily, adding lukewarm water as needed. If the room where your incubator is placed is already humid, you may not need to add water as frequently than if your incubator is in a dry climate.
Check Your Sensor
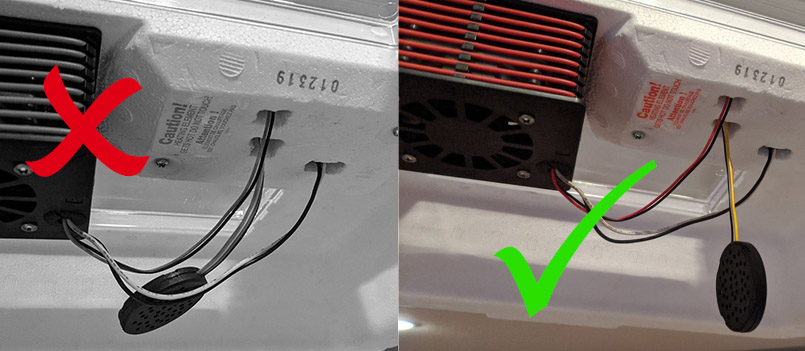
When setting up your Little Giant® incubator it is very important to make sure all cables are securely connected as it is possible they could become loose. Also be sure to make sure the sensor on the lid of your unit is hanging freely and not caught in any other cables. The sensor can only measure the temperature and humidity at its specific location in the unit, so it is important that it hangs freely and is not tangled up in a higher location. Temperatures can vary inside your unit depending on the height and distance from the center.
Secondary Thermometer
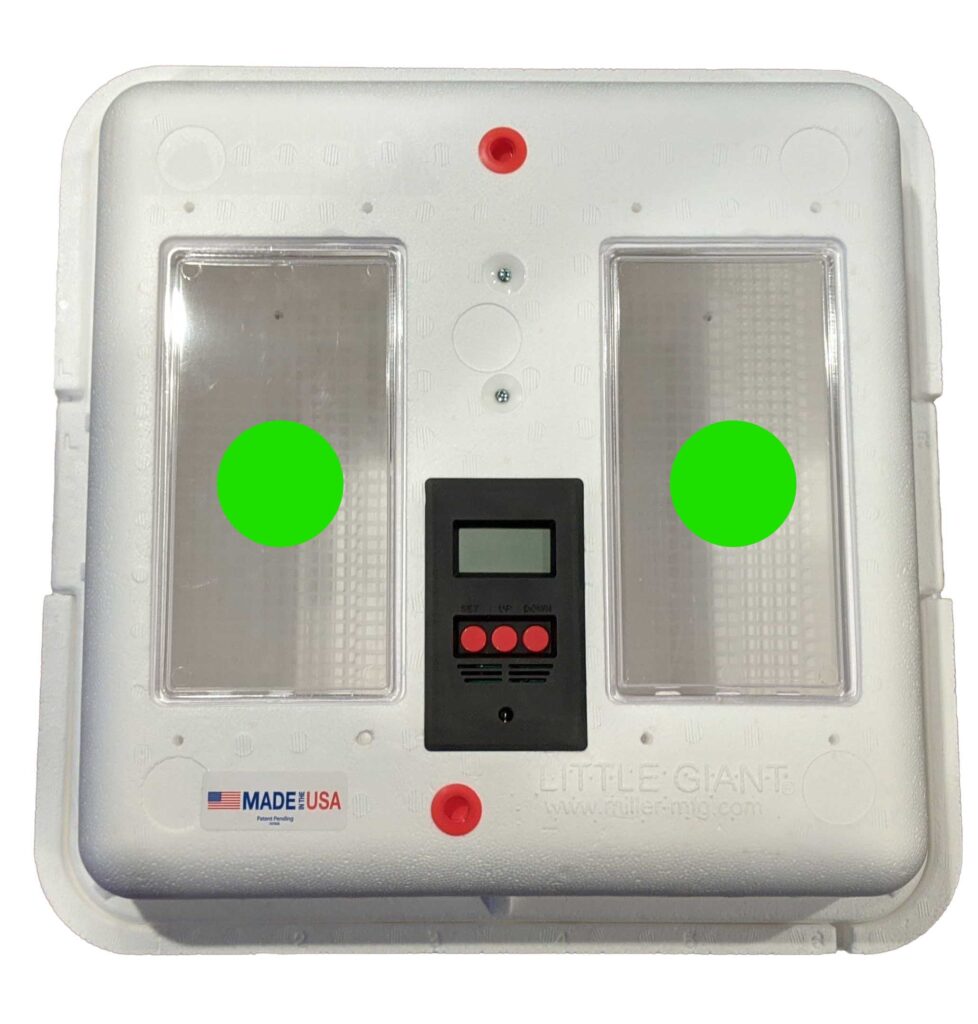
For best results, we recommend the use of a trusted calibrated second thermometer in addition to the one built into your Little Giant® unit. There are combination units available that will measure both temperature and humidity. If a combination hygrometer/thermometer is unavailable in your area, a common household medical thermometer will work just fine. We recommend placing your secondary thermometer at egg height in the middle of either window.
The second thermometer will help to give you a more accurate view of the temperatures at egg level in your unit.
When setting up your unit, please use this worksheet to help set your incubator using a secondary thermometer. You may want to adjust your set temperature based on secondary thermometer readings.
WHY IS THIS?
The hanging sensor gives an accurate reading but can only measure the temperature at its specific location within the unit. Temperatures may vary inside the incubator depending on the environment of the location where you choose to keep your unit. For best results, we recommend consulting with a local expert in your area, keeping your incubator in a room with a consistent temperature between 70-85 F, using a second thermometer located at egg level, and rotating the location of your eggs in the unit when turning.
In addition to the small differences in temperature due to location, you may notice the temperature of your secondary thermometer go up and down a few degrees as the incubator runs. This is due to the normal heating cycles of the unit and is okay as long as your average temperature is at your desired set point.
To regulate heat in your Little Giant® Incubator, the system runs in cycles. The hanging sensor will read the temperature in its location in the incubator. When the incubator sensor detects a temperature below the set temperature, it will activate the heater raising the temperature until the temperature detected by the sensor matches the set temperature. It will then turn the heating component off until the temperature dips below the set temperature. Depending on the temperature and humidity in your incubator’s location, this cycle can happen more or less frequently. The average temperature is one of the important factors for the incubation of your chicks and is why we recommend you take an average reading over the course of 10 minutes when using the worksheet.
Frequently Asked Questions / Troubleshooting
It is best to place your unit in a room with a consistent temperature between 70-85 degrees with minimal traffic and away from anything that could periodically change the temperature outside the incubator like a radiator or drafty window.
No. A towel or any other fabric may restrict air flow.
Please use this worksheet to calibrate your incubator. Some temporary temperature changes are normal. If after calibrating you still see a large difference of 5-10 degrees, please call Miller Customer Service at 800-260-0888.
Please check that the sensor cable is securely connected to the board. Gently pull on the sensor, if it comes free, insert it back into the board. There should be a click sound when you reattach it. If the cable is secured and you still see a flashing 32F on the controller, please call Miller Customer Service at 800-260-0888.
Changes in humidity can take up to 2 hours for the incubator’s sensor to detect. If the humidity reading does not change after adding water and waiting 2 hours, please call Miller Customer Service at 800-260-0888.
The unit will blink 188F when the controller is first plugged in. If blinking at 188F continues, check to ensure the power cord is completely plugged into the incubator. If the power cord is completely plugged in and the blinking continues, please call Miller Customer Service at 800-260-0888.
I’m concerned my egg turner isn’t working It will take up to 4 hours for the turner to turn side to side. You will not be able to see this movement with the naked eye. To verify your egg turner is functioning correctly, mark the arm where the rail would attach in the egg turner with a marker. Also place a mark on the actual rail where the rotating arm is located. Plug the egg turner in and check it after an hour, you should see that the marks are no longer lined up and in different spots. If they have not moved, please call Miller Customer Service at 800-260-0888DISCLAIMER: Due to the numerous factors relating to the hatching of eggs, Miller Manufacturing makes no warranty whatsoever in respect to the number of eggs that will hatch using the Little Giant ® Incubators or the Little Giant® Automatic Egg Turner.